Pressure and Wind expansion
The base code enables you to read and display two most basic things for a weather station – temperature and humidity. This code was greatly improved by Alessandro Catorcini who has added a pressure sensor and is planning on adding a wind sensor as well! To start with this expansion, you will need the BMP180 (or BMP085) sensor (you can get it here) and the changed code for reading and displaying the values. All credits and thanks go to Alessandro Catorcini!
The wiring is explained in the following image. The sensor itself can coexist on the same breadboard with the DHT22 sensor.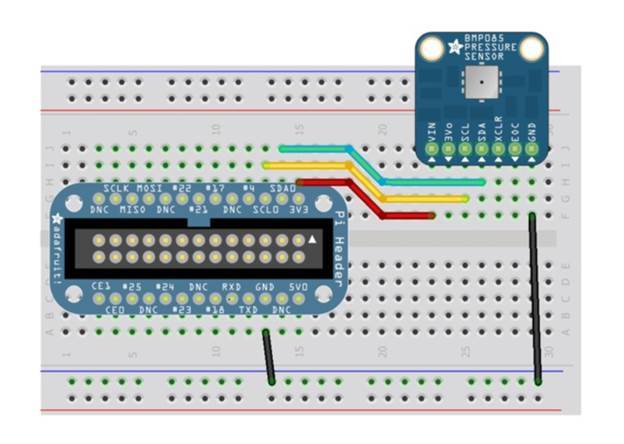 After wiring the BMP 180 sensor, enable the I2C interface. Do this by loading the kernel modules on boot and removing them from the black list with the command sudo nano /etc/modules. Add the following i2c-bcm2708 and i2c-dev, each to its own line. Save your changes and reboot.
The I2C bus allows multiple devices to be connected to your Raspberry Pi, each with a unique address, that can often be set by changing jumper settings on the module. It is very useful to be able to see which devices are connected to your Pi as a way of making sure everything is working. To do this, it is worth running the following commands in the Terminal to install the i2c-tools utility with the commands sudo apt-get install python-smbus and sudo apt-get install i2c-tools.
After wiring the BMP 180 sensor, enable the I2C interface. Do this by loading the kernel modules on boot and removing them from the black list with the command sudo nano /etc/modules. Add the following i2c-bcm2708 and i2c-dev, each to its own line. Save your changes and reboot.
The I2C bus allows multiple devices to be connected to your Raspberry Pi, each with a unique address, that can often be set by changing jumper settings on the module. It is very useful to be able to see which devices are connected to your Pi as a way of making sure everything is working. To do this, it is worth running the following commands in the Terminal to install the i2c-tools utility with the commands sudo apt-get install python-smbus and sudo apt-get install i2c-tools.
To make sure the modules not not blacklisted use sudo nano /etc/modprobe.d/raspi-blacklist.conf. Comment out the lines relevant to the ic2 modules so that the entries in the file look like #blacklist spi-bcm2708 and #blacklist i2c-bcm2708. Save the file and reboot again. Make sure that the i2C bus is working by issuing sudo i2cdetect -y 1.
The second step is to get the right modules ready for the reading routines. Update with sudo apt-get update and when its completed type in sudo apt-get install build-essential python-dev python-smbus. Get a hold of the Adafruit project hosted on Github with git clone https://github.com/adafruit/Adafruit_Python_BMP.git. Move to this folder with cd Adafruit_Python_BMP and install it with sudo python setup.py install.
Now you can test your sensor to make sure everything went fine to this point. Move to the examples folder cd examples and run the test script sudo python simpletest.py. You should see an output like:
Temp = 22.20 *C
Pressure = 99353.00 Pa
Altitude = 164.39 m
Sealevel Pressure = 99366.00 Pa
Now to the easier part! You have to get a copy of the forked versions for the WordPress plugin and Python script. Get the latter with git clone -b PressureWind https://github.com/peterkodermac/Raspberry-Weather.git. Now modify the script file with nano getInfo.py. Change the first two variables according to your settings – databaseUsername, databasePassword and if needed databaseName. Give the script a spin and see if it correctly reads the pressure. If you have previous records in your database, simply ALTER the current database and add the new column. Take a look at the createTable.sql, it should clarify things a bit. Now you need to use the modified WordPress plugin. Go to https://github.com/peterkodermac/Raspberry-Weather-WordPress and download the source (button on the right part of the page). You should get a zip file, which needs to be uploaded to your WordPress site. Navigate to your dashboard, select Plugins and click on Add new. Afterwards, click on Upload new and upload the newly downloaded zip. WordPress will do the rest, you only have to enable it and use it on a page of your choosing.